This blog is to show my current work for the robot design which has also introduced me into more features embedded into Photoshop. I started with looking at specific robot sketches on pinterest and taken interest with the design of which I can bring into my own sketches.
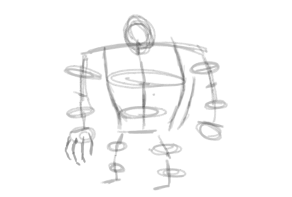
I first started with the basic measurement sketches where I can start looking at how big each, portion of the robot will be throughout the drawing. This can massively help me to plan forward and prevent hitting a brick wall during the main outline of the character.
measurement Sketch
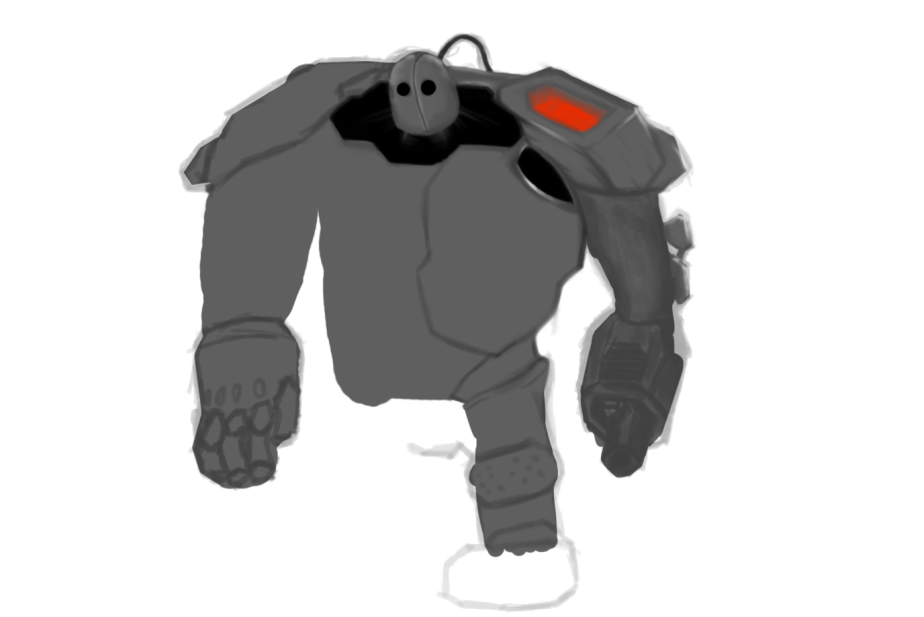
The main outline of the character was filled around the measurement sketches so I can therefore make sure that I can plan out what can be added. This can also give me a guide to what I can exaggerate and keep real to an extent. As you can see the shoulders are really exaggerated in comparison to the feet which looks more relatable to the characters primary mass.
Outline
Measuring + Outline
I then move on to colouring, I start with the primary colour of the robot covering the entire drawing. By doing this, I can overlay this colour and not needing to worry about asking mistakes to the base colour of the robot, to make sure I have no mistakes and I can go back to where I have come from. I make external assets such as eyes on different layers and the shading on another additional layer.
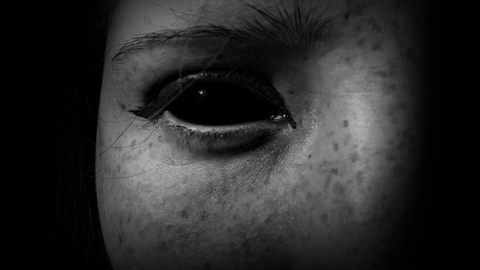
This is something I have wanted to post for a while as I have also wanted to do this type of small project and thanks to a few lessons in VFX, I have finally done it. And to be fair it was easier than I thought.
Our recent lesson was a catch up on 3D camera movement and tracking points, sounds like mumbo Jumbo let me show you what I mean.
First off I recorded a small video of my partner looking directly into the lens and by keeping still, I can track the eyes movement frame-by frame so the tracking points can hopefully stay where they are placed rather than moving all over the frame.
The golden position for attaching a tracking point is to having it where there are two completely clean breaks in colours. By doing this the trackers should stay close to where you assign them.
This is what you should have after running the tracking system…
These small compacted red dots are exactly what you need when tracking movement, this will make applying the effect a lot more easier on the animator and the actual ‘Null’ which the motion has been applied to.
Finally you would need to create a solid within your timeline and use the pen tool to cut out the exact shape you want, in this case I wanted to cut out the solid shape to the colour of an eye but only the inner part or more scientifically the ‘Sclera’.
Yes I did look that up to sound smart…
Anyway, after all that was finished. I had more time to experiment, looking at the entire scene. It looked too nice and original to have such an eerie looking eye so I then continued to add adjustment layers such as a black and white filter and also apply contrast settings which gave my partners face a more natural look in connection with the eye itself.
This is the result of only 15 minutes work which is really good considering I havent had much experience with tracking.
This will be the last time I upload a post relating to the room scene which I have created in Maya. Looking back I feel like I have achieved so much that I never thought I could achieve in the 3D world of Maya.
But it hasn’t all been easy…
As I was coming to an end of modelling one of the fireplace models, I saved the file and left it for the next day where at the point I open up the same file and the whole model corrupted… A single tear rolls down my eye. But I didn’t let it get the best of me, I had time to rebuild the fireplace, continue UV unwrapping and lighting until I pretty much got the same model which I had prior to the event which taken place.
On the other hand, modelling other assets was like looking at a masterpiece in my opinion. Learning about specular maps, Normal Maps, Bump maps, texturing and other ways to add life to a 3D model. Now when I start creating another asset for a scene, I tend to have an eye of realism. Therefore, everything needs to look amazing and without any major faults such as missing sections of a model or twisted polygons.
These are some renders which I have just done before I started this blog…
This slideshow requires JavaScript.
Overall I feel way more confident in modelling and how to look at something and find different ways to start from what points. Additionally, I have more experience in texturing with Maps. These are the different types of ‘Maps’ which I have used to complete each asset in my room scene;
Bump Maps
Bump maps are what gives a flat plain, a bump like texture which corresponds to the JPEG it has come from. This saves a modeller hours of having to sculpt out a specific texture, also this bump map was created on Photoshop with a greyscale filter for it to therefore have effect on the models.
Normal Maps
Similar to bump maps in every way other than this Map consumes a lot more memory in comparison to Bump Maps but it has a more accuracy whilst engraving into the texture which comes in handy especially if you are into realism.
Specular Maps
Specular Maps are really different in how they appear and how they are made in comparison to other Maps. Simply, the White is where the reflected light will show and the black will absorb all the light. Take not though… this file has to be saved as a ‘.tga’ file format otherwise the effect wont take place.
Reflection Maps
Reflection maps are quite tricky to execute but how they are made is quite easy, all that’s required is a panoramic photo and Something to apply it to this will give out a reflection effect to any material you can apply it to. This will be somewhat distorted when applied to something which has a curve.
Panoramic photo
So that’s it, I am really happy with how my room has come out and I hope to take away a few lesson in how to become a better 3Dmodeler.
Click the link below for my Room Scene PowerPoint Presentation where I show off my favourite models, renders and explain how I done those models.
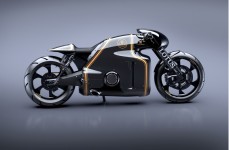
Moving on from the humanoid character we are now or focusing on vehicles for next project in concept art. Well being told to currently research and find new Concepts for a motorbike but not just any more about this motorbike has to have the ability to glide or go across water alongside of traveling amongst land.
So rather than going on Google search images instead went on Pinterest and started my result from that point I use Pinterest because were people allowed to post pictures they become collaborative therefore there a a wider range of Concepts that are available to me. And as soon as I have one or two or more pictures I start thinking about how I am supposed to merge these designs all together.
As soon as I had to complete this minor task I then went on to draw and sketch out my designs which you can see in the image below.
The first design you see has many similarities to a current lotus concept the entire design has been copied yet I have added some altercations such as water hydro thrusters or normal air thrusters beneath the fuel tanks of the bike which flip out at a 90 degree angle and face down towards the surface lifting the bike upwards from the water. I also have designed a completely random design which in my head which mostly looks similar to the sharp design of a lamborghini or the hover bikes out of saints row the third. This design has two ski like features in build into the bike which flip underneath and should skim accross the water therefore having the same characteristics as a jet ski.

 The golden position for attaching a tracking point is to having it where there are two completely clean breaks in colours. By doing this the trackers should stay close to where you assign them.
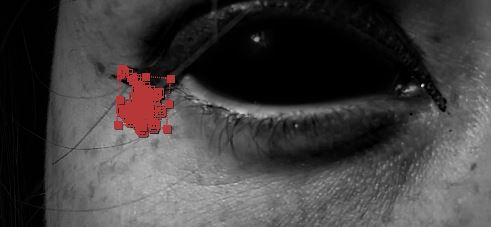 These small compacted red dots are exactly what you need when tracking movement, this will make applying the effect a lot more easier on the animator and the actual ‘Null’ which the motion has been applied to.